Monday, January 5, 2015

Happy 2015

It's hard to believe the Holidays are over already. All the decorations are down and the house is back to "normal." It looks so bare. I hope your Holiday season was wonderful.I spent much of my holiday time putting on Christmas by Candlelight VIII. We have two dinners of 14 people each time.

Here's the table before anyone sat down (if you look carefully you can see the napkins are folded like little suit jackets):


There were 6 courses. Here's the menu in pictures.


Above is course zero, an amuse bouche. A single bite consisting of celantro, topped with a garlic crouton, stilton cheese infused with a cardomon sead and a bit of celery for crunch.


 The first course, a crepe rolled like an English Christmas cracker hand-rolled & tied Crêpes stuffed with morsels of Shredded Organic Chicken Breast blended with Boursin Cheese, white wine, tarragon & green onions and sauced by the same, then garnished with Pimentos & Chopped Fresh Parsley


The second course was Winter Kale from our garden & Masoor Lentils simmered in light chicken stock with New Orleans spices finished by Home-grown Basil and served with hot, straight from our ovens Home-made Traditional “French” Rolls


Our fish course, the third was a Trio of Roasted Pacific Shrimp lightly dusted with Hungarian Paprika, topped with a Cherry Tomato served with a reduction of Shallots, Red Wine & Tamarind and garnished with Radish Sprouts


Course four was a Unique Sorbet made from an intense reduction of puréed Georgia Peaches softened with a dew drop of Kentucky Bourbon and presented in a Chilled Baby Martini Glass.

Before the main course, the table lights are turned off and we dine solely by candlelight. The empty seats above are the couple in the kitchen helping us bus and serve the next course. We have each couple sign up to help during each course. It wouldn't be possible to serve 14 people without help.


The main course was Spécialité de la Maison “Yule Log” a Butterflied Pork Tenderloin rolled with Caramelized Parsnip Slices and layered with pressed Sage & Onion Stuffing presented with
Potatoes Pave accompanied by Pan-Roasted Brussel Sprouts finished with a Dijon Marsala Sauce.


Course 6, Lemon Bliss, Marbled White Chocolate Cups filled with Zesty Lemon Mousse softened with a touch of Freshly-whipped Cream decorated with Fresh Raspberries and Chocolate Mint Leaves from our garden


 The year ahead bring with it lots of promise - I wish you all a happy one!

Wednesday, November 5, 2014

Thanksgiving Table Vases

Need extra vases for your Thanksgiving table? Just take old pickle jars, mayonnaise jars, peanut butter jars, etc. and wrap them in fabric. Use scraps from your stash in Thanksgiving colors. Measure the size of your jar but measuring from the top of one side down to the bottom. Double this measurement. Then measure across the bottom of the jar. Add this number to the measurement you already have. Add another 4 inches to your measurement. Draw a square on your fabric that is this measurement across in both directions. Cut out the square. Set the jar in the middle of the fabric square and bring the sides up. Using ribbon, raffia or string, tie the fabric to the jar at the rim where the lid used to be screwed on. I don't even bother to finish the edges of the fabric when I do this. I just carefully fill the jar with water and add flowers. After the holiday, the fabric can go back into your stash.


Here's one I made out of linen scraps.

Here it is again with some basil flowers in the jar.

Thursday, October 30, 2014

My Weekend at ETA-CA

I spent last weekend at the ETA-CA show (Education for Textile Arts, California). It was my 9th year and I must say it's one of my favorite shows. It's so great to see all my friends and make new ones.

Here's my booth:
The quilt is made from my newest book, "The Completefly Amazing In-the-Hoop Heirloom Quilt." The book's not out yet, but I took the quilt anyway.

This is a shot of my French scarves in-the-hoop.

The ETA-CA show is all about education, not so much about shopping. I had three fantastic classes - fantastic because the students were so wonderful. I'm already looking forward to next year.

Wednesday, October 8, 2014

Beautiful Basil Flowers

I was out in the garden this morning - it was a beautiful morning, just perfect for gardening. My basil had grown like crazy over the last week. The weather was hot and it had bolted a bit. I cut off the tops and placed them in a jar in the kitchen. It smells wonderful and the dainty flowers are so pretty. Here;s a photo:


I also picked tomatoes. Bruschetta tonight.

Thursday, October 2, 2014

Cleaning my Room

I'm a little embarrassed to say how bad my studio got while I was working on my new book and a magazine article. Bue here's the pictures to show you. It was horrible. My sewing machine needed service so I took advantage of the couple of days off to clean my room. Before I show you the pictures, I should say that I generally hate clutter. I can't start cooking in a messy kitchen and clutter in general makes me nervous. How I got to this point? Just being in a hurry.

Okay, here we go - first the mess.


I could hardly type because there was so much stuff on the desk.


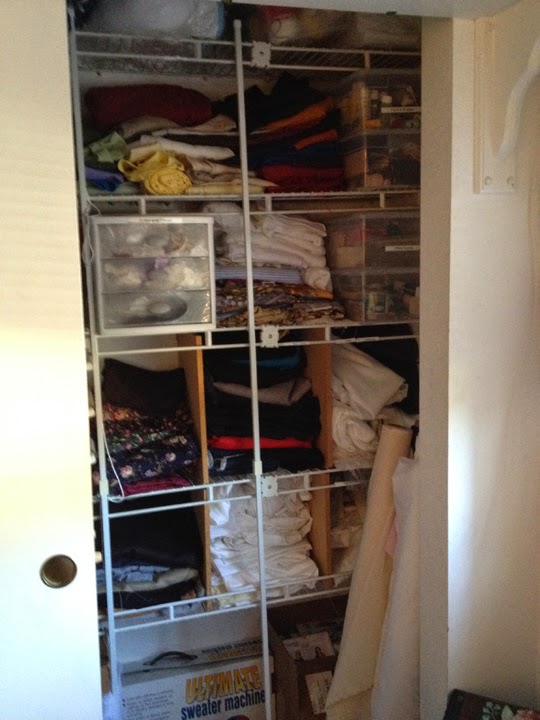
 My fabric, etc. was bulging out of the closet.


I think you get the idea that I was being a total slob.  The studio space was overflowing with stuff. I pulled everything out of the closet and cupboards and got to work. When I was done at the end of the second day, I had created order out of chaos.

Here's the photos with comments.


My sewing machine goes on the little stand on the right, you can see it's missing, but the area is now cleaned up and ready for sewing. I covered boxes and magazine holders with fabric and paper (I still have a couple to finish) so they look pretty on the shelf. I added labels to everything so I can put things back when I'm done.


I refolded all my fabric (except the large rolls) and added some bins to hold the smaller things like lace thread office supplies, etc. I still have a lot of fabric, but at least I can see it now.


This is the other side of the closet. More bins and boxes. I also added a couple of hooks so I can hang any garments I'm working on. The cable on the wall looks a little messy - it's temporary, it's been temporary for about 12 years.


I even added large bins under the daybed for magazines that I want to save. They're a lot neater than when I just stuffed them under there.


This little table is a round sitting on a filing cabinet filled with papers and supplies. The top holds my guillotine cutter and laptop. You can see my lace shaping and cutting boards stacket next to it. The phone is from the 1920's.


I made a box ( I love making boxes) for my desk where I can keep my current project - one at a time please!


I can now sit on my daybed. The hoops in on the wall were my grandmothers when she was a little girl.

I now have a real work space where I can design my projects. I like to draw them using colored pencils and then work on the computer to create them and finally over to the sewing area to test them. The old Singer on the shelf was found by a trash can - someone was throwing it away! The wallpaper on the computer is a picture I took of the Sonning bridge across the river Thames in England. It's one of my favorite spots in the world.

Thursday, September 11, 2014

My Friend Martha


I've know Martha Pullen for a long time. She's one of the most amazing people I've ever known. First of all after she'd met me only once, the next time she saw me, she remembered my name. To me that's incredible. She meets literally thousands of people every month – how does she do that? How does she remember their names? That's only a tiny part of what this woman can do.

This is her newest book – one of 50 or so she has written.

She took the time to write this book, not to make tons of money like so many that write self-help books aspire to. She wrote it to help others fulfill their dreams.

Here's one of the most amazing things about Martha right now in 2014. She sold her company a couple of years ago and left it this past year. Instead of sitting back and enjoying the fruits of her labor – she's starting over. She's excited, enthusiastic and full of fun and exuberance. It contagious! She's part of the new generation of 50 plus people who refuse to use the "r" word and continue to live life to its fullest.

On to the book. Do you want to make it with your sewing or craft? Do you have excuses why you can't? Look at Martha. She's still doing it. She's an inspiration and so is her book.

If you can only purchase one book this year, it has to be Martha's! You can purchase it at http://www.pullenbusiness.com/

Once you read it, I think you'll agree with me – she's one amazing woman.


Buy the Book

Tuesday, September 2, 2014

Silverware Holder

With so many holidays coming up soon, I thought it was time to better organize my silver flatware. I've kept them in the plastic bags they came stuffed in a shopping bag. So, I started out with a couple of yards of linen. and a couple of yards of silver cloth. I could only find silver cloth in dark brown at my local fabric shop, so that's what I used.If you can't find silver cloth, you can use felt.

Here's the supplies list for each place setting:

·    20 x 10½ inch piece of linen for
·    20 x 10 ½ piece of silver cloth
·    2 1 yard pieces of ¼ inch silk ribbon
·    Embroidery design (Flower from Dainty Borders was used twice)
·    Stabilizer
·    Wash-away fabric marker
·    Size 80 universal needle

The first thing I did was cut my 8 rectangles 20 by 10 1/2  inches. I came up with this size by measuring my knife, the longest piece and figured out how much extra fabric I needed to fold up for the pockets and down for the flap. I then set my 5 piece place setting next to each other, leaving space between and measured that. I added an extra inch so I could have 1/2 inch seams. My measurements should work for any silverware.

To keep the linen cuts straight, I pulled a thread in each direction and cut on the line. I set the linen on the silver cloth and used the linen as a pattern guide for cutting it.


1.    Lay the linen so the short side is top and bottom and the long sides are left and right.Measure up  2 ½ inches fro the short side of the linen and 5 inches from the left side (with the short side at the bottom) and make a mark. This is the center of your embroidery.

2.    Embroider the design in this spot.  The embroidery is optional, but I tend to embroider everything I can.

3.    With right sides together, sew the linen and silver cloth all the way around all 4 sides leaving a 3-4 inch hole on one side to turn.

4.    Turn the piece right side out and press.  Press one short end up 5 inches.

5.    Top stitch around all 4 sides - you’ll be sewing the fold you made above. 

6.    Mark 4 lines on the 5 inch piece and sew a straight line to create 5 little silverware pockets.

7.    Fold the top short end over the lower one and top stitch the fold. I used pins instead of a marker because I didn't want to wash the silver cloth. You could use a air erase marker.


8.    Sew two pieces of ribbon 2 inches from each folded and sewn sides and 6 inches from the side that has the embroidery.


9.    Place the silver in the pockets and roll up the holder and tie the ribbon.


I hope you like this project.

Kandi