Wednesday, November 5, 2014

Thanksgiving Table Vases

Need extra vases for your Thanksgiving table? Just take old pickle jars, mayonnaise jars, peanut butter jars, etc. and wrap them in fabric. Use scraps from your stash in Thanksgiving colors. Measure the size of your jar but measuring from the top of one side down to the bottom. Double this measurement. Then measure across the bottom of the jar. Add this number to the measurement you already have. Add another 4 inches to your measurement. Draw a square on your fabric that is this measurement across in both directions. Cut out the square. Set the jar in the middle of the fabric square and bring the sides up. Using ribbon, raffia or string, tie the fabric to the jar at the rim where the lid used to be screwed on. I don't even bother to finish the edges of the fabric when I do this. I just carefully fill the jar with water and add flowers. After the holiday, the fabric can go back into your stash.


Here's one I made out of linen scraps.

Here it is again with some basil flowers in the jar.

Thursday, October 30, 2014

My Weekend at ETA-CA

I spent last weekend at the ETA-CA show (Education for Textile Arts, California). It was my 9th year and I must say it's one of my favorite shows. It's so great to see all my friends and make new ones.

Here's my booth:
The quilt is made from my newest book, "The Completefly Amazing In-the-Hoop Heirloom Quilt." The book's not out yet, but I took the quilt anyway.

This is a shot of my French scarves in-the-hoop.

The ETA-CA show is all about education, not so much about shopping. I had three fantastic classes - fantastic because the students were so wonderful. I'm already looking forward to next year.

Wednesday, October 8, 2014

Beautiful Basil Flowers

I was out in the garden this morning - it was a beautiful morning, just perfect for gardening. My basil had grown like crazy over the last week. The weather was hot and it had bolted a bit. I cut off the tops and placed them in a jar in the kitchen. It smells wonderful and the dainty flowers are so pretty. Here;s a photo:


I also picked tomatoes. Bruschetta tonight.

Thursday, October 2, 2014

Cleaning my Room

I'm a little embarrassed to say how bad my studio got while I was working on my new book and a magazine article. Bue here's the pictures to show you. It was horrible. My sewing machine needed service so I took advantage of the couple of days off to clean my room. Before I show you the pictures, I should say that I generally hate clutter. I can't start cooking in a messy kitchen and clutter in general makes me nervous. How I got to this point? Just being in a hurry.

Okay, here we go - first the mess.


I could hardly type because there was so much stuff on the desk.


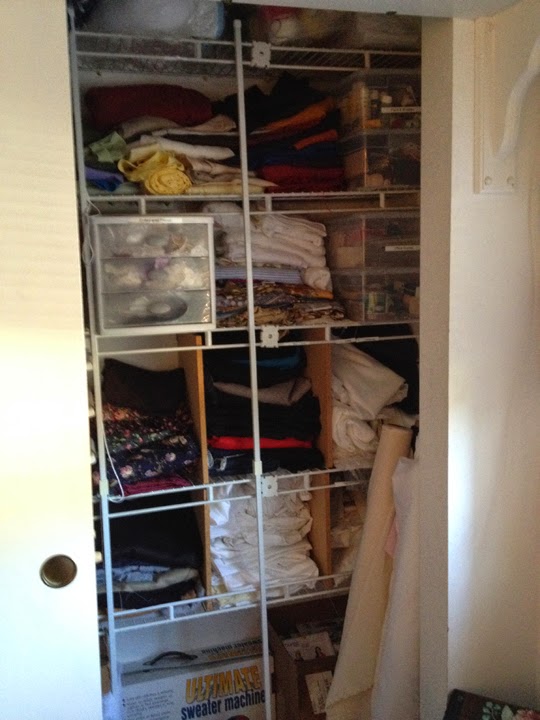
 My fabric, etc. was bulging out of the closet.


I think you get the idea that I was being a total slob.  The studio space was overflowing with stuff. I pulled everything out of the closet and cupboards and got to work. When I was done at the end of the second day, I had created order out of chaos.

Here's the photos with comments.


My sewing machine goes on the little stand on the right, you can see it's missing, but the area is now cleaned up and ready for sewing. I covered boxes and magazine holders with fabric and paper (I still have a couple to finish) so they look pretty on the shelf. I added labels to everything so I can put things back when I'm done.


I refolded all my fabric (except the large rolls) and added some bins to hold the smaller things like lace thread office supplies, etc. I still have a lot of fabric, but at least I can see it now.


This is the other side of the closet. More bins and boxes. I also added a couple of hooks so I can hang any garments I'm working on. The cable on the wall looks a little messy - it's temporary, it's been temporary for about 12 years.


I even added large bins under the daybed for magazines that I want to save. They're a lot neater than when I just stuffed them under there.


This little table is a round sitting on a filing cabinet filled with papers and supplies. The top holds my guillotine cutter and laptop. You can see my lace shaping and cutting boards stacket next to it. The phone is from the 1920's.


I made a box ( I love making boxes) for my desk where I can keep my current project - one at a time please!


I can now sit on my daybed. The hoops in on the wall were my grandmothers when she was a little girl.

I now have a real work space where I can design my projects. I like to draw them using colored pencils and then work on the computer to create them and finally over to the sewing area to test them. The old Singer on the shelf was found by a trash can - someone was throwing it away! The wallpaper on the computer is a picture I took of the Sonning bridge across the river Thames in England. It's one of my favorite spots in the world.

Thursday, September 11, 2014

My Friend Martha


I've know Martha Pullen for a long time. She's one of the most amazing people I've ever known. First of all after she'd met me only once, the next time she saw me, she remembered my name. To me that's incredible. She meets literally thousands of people every month – how does she do that? How does she remember their names? That's only a tiny part of what this woman can do.

This is her newest book – one of 50 or so she has written.

She took the time to write this book, not to make tons of money like so many that write self-help books aspire to. She wrote it to help others fulfill their dreams.

Here's one of the most amazing things about Martha right now in 2014. She sold her company a couple of years ago and left it this past year. Instead of sitting back and enjoying the fruits of her labor – she's starting over. She's excited, enthusiastic and full of fun and exuberance. It contagious! She's part of the new generation of 50 plus people who refuse to use the "r" word and continue to live life to its fullest.

On to the book. Do you want to make it with your sewing or craft? Do you have excuses why you can't? Look at Martha. She's still doing it. She's an inspiration and so is her book.

If you can only purchase one book this year, it has to be Martha's! You can purchase it at http://www.pullenbusiness.com/

Once you read it, I think you'll agree with me – she's one amazing woman.


Buy the Book

Tuesday, September 2, 2014

Silverware Holder

With so many holidays coming up soon, I thought it was time to better organize my silver flatware. I've kept them in the plastic bags they came stuffed in a shopping bag. So, I started out with a couple of yards of linen. and a couple of yards of silver cloth. I could only find silver cloth in dark brown at my local fabric shop, so that's what I used.If you can't find silver cloth, you can use felt.

Here's the supplies list for each place setting:

·    20 x 10½ inch piece of linen for
·    20 x 10 ½ piece of silver cloth
·    2 1 yard pieces of ¼ inch silk ribbon
·    Embroidery design (Flower from Dainty Borders was used twice)
·    Stabilizer
·    Wash-away fabric marker
·    Size 80 universal needle

The first thing I did was cut my 8 rectangles 20 by 10 1/2  inches. I came up with this size by measuring my knife, the longest piece and figured out how much extra fabric I needed to fold up for the pockets and down for the flap. I then set my 5 piece place setting next to each other, leaving space between and measured that. I added an extra inch so I could have 1/2 inch seams. My measurements should work for any silverware.

To keep the linen cuts straight, I pulled a thread in each direction and cut on the line. I set the linen on the silver cloth and used the linen as a pattern guide for cutting it.


1.    Lay the linen so the short side is top and bottom and the long sides are left and right.Measure up  2 ½ inches fro the short side of the linen and 5 inches from the left side (with the short side at the bottom) and make a mark. This is the center of your embroidery.

2.    Embroider the design in this spot.  The embroidery is optional, but I tend to embroider everything I can.

3.    With right sides together, sew the linen and silver cloth all the way around all 4 sides leaving a 3-4 inch hole on one side to turn.

4.    Turn the piece right side out and press.  Press one short end up 5 inches.

5.    Top stitch around all 4 sides - you’ll be sewing the fold you made above. 

6.    Mark 4 lines on the 5 inch piece and sew a straight line to create 5 little silverware pockets.

7.    Fold the top short end over the lower one and top stitch the fold. I used pins instead of a marker because I didn't want to wash the silver cloth. You could use a air erase marker.


8.    Sew two pieces of ribbon 2 inches from each folded and sewn sides and 6 inches from the side that has the embroidery.


9.    Place the silver in the pockets and roll up the holder and tie the ribbon.


I hope you like this project.

Kandi

Wednesday, August 13, 2014

Gift Towels for the Hostess (or Host) How to

Whenever I'm invited to someone's house for lunch or dinner the first time, I always take a tea towel as a hostess gift. They're always received well. Those of us who sew often think something as simple and easy to make as a tea towel isn't much. But, those who don't sew really appreciate the gesture. Actually, those of us who sew also appreciate it. I love getting a hand crafted gift from a friend. Here are some of the towels I have made recently with instructions about how they were made. I hope they inspire you.

All of these towels were made from 100 percent linen. The linen I have is 58 inches wide so I can make two across. I like the towels big, so I cut them 28 inches long and 22 inches wide (I cut off the selvage which is why they are 28 inches). Out of 1 yard, I can get two towels and have 3/8 of a yard left over. If you don't mind a narrower towel, you can get four from a yard by cutting them 29 x 18 inches.

After you cut the towel, finish all four sides with a zigzag stitch or serge them. Turn the side seams under by 1/4 inch and stitch them down. The back hem should be 1/2 inch. Follow the instructions below for each individual towel front.


These first three have been hem stitched. Fold the front hem up 1 1/2 inches and press. Either pin the hem in place, or use a product like Steam-a-Seam to hold it in place. Insert a size 120 wing needle into your sewing machine. Using a pin stitch set W=3.0, L=3.0 and stitch along the hemline. If you don't have a pin stitch, from the back, zigzag W=2.0, L=2.0 along the hemline with a size 80 needle. Change to the wing needle and from the front, stitch a reinforced straight stitch above the edge of the hem. Add the embellishment when you are done with the hem.

On this next towel, 4 inch wide lace was added at the hemline. Turn the front hem up 1 inch and stitch it down with a straight stitch. Place the lace over the hemline, about a 1/4 inch above the hem bottom. Stitch it to the towel using matching thread and a tiny zigzag stitch L=2.0, W=2.0. The zigzag stitch doesn't show like a straight stitch would. Embroider you design or  embellish the front above the lace.


The next two towels have a satin stitch at the hemline. Fold the hem up 1 1/2 inches. On the wrong side of the towel, using matching thread (white in this case), stitch a straight line next to the unfinished edge as close as you can get. If you need to, carefully cut away the excess fabric so when you sew your satin stitch, it will completely cover the raw edge. Set you machine up for a satin stitch. Place tear-away stabilizer under the hemline you sewed. Using contrasting thread, or a color to match the embroidery you plan to sew, stitch a satin stitch on the front of the towel, sewing along the line you previously have sewn. Remove the stabilizer and add the embellishment.


The last towel has a contrasting band along the bottom. Cut the band 4 inches by 23 inches (or 1 inch wider than your towel) Sew a piece of bridging onto the lower raw edge of the towel. zigzag or serge the raw edge of the bridging and towel to make it neat. Press the seam allowance toward the towel body. Sew the band on the front lower edge of the bridging. Press the band down toward the raw edge. Press the opposite edge of the band under 1/2 inch - make sure you turn it towards the wrong side - press it in place. Turn the band back up right sides together, matching the 1/2 inch back hem with the top of the ban. Stitch a 1/2 inch seam allowance on both sides. Turn the band right side out enclosing the raw edges and press again. Use a product like Stitch Witchery or permanent fabric glue to hold everything in place.


I hope you like these and start your own tradition of making towels as a gift. Let me know what you think below. (If you're the first, remember, you can click on the "no comments" link to add the first comment.

BTW you can get the fabric and embroidery designs at www.sewtimeless.com.

Enjoy, Kandi


Monday, July 28, 2014

Writing Articles

I can't tell you how exciting it is for me to see an article I have written in a magazine. I've written for many of the sewing magazines over the years, but it doesn't change how wonderful it is to open the page and see "written by Kandi L. Christian." This month I have an article that features one of my embroidery CDs called "Faux Madeira Applique" in Designs in Machine Embroidery magazine. I want to thank them for allowing me to share these photos. I've removed the article though - to read that you'll have to get the magazine. I bet a lot of you already subscribe.

These two jackets use the exact same embroidery design, but they couldn't look more different. Also, even though they use Madeira applique, which is an heirloom technique, they are modern because they're modern because of the fabric choices.


Let me know what you think. I hope you get a chance to try one or two of these jackets for your own wardrobe. - Kandi

Thursday, July 24, 2014

Threading Needles

I was fixing some patio cushions today and as I was threading the needle with very thick thread, I thought I would share how I thread a needle. I know this is something very simple, but there is more than one way. In the book, "Tom Sawyer," Tom identity was discovered when he tried to disguise himself as a girl to attend his own funeral. It wasn't because of the way he looked, it was because he threaded a needle by bringing the needle to the thread instead of the thread to the needle. I digress. For years now, I have threaded a needle by folding about 1/3 of the thread down. Then you push the folded edge through the needle. This works for thick thread, like I was using today, or really, really small eye holes. The fold is stronger than a single thread and it really works. Also, you can hold the folded edge against your finger as you push it through the eye. Try it and let me know what you think.  Kandi

Wednesday, July 9, 2014

Growing from Seed - Amazing

I am always amazed with the first little leaves pop up from the garden after I've planted seeds. It's a miracle to me that I can plant a seed and grow food. After I plant the seeds, I find myself checking for signs of germination. Then one day, they start. I always grow from seeds, so my garden is usually a little behind. I'm catching up. My grape tomatoes are turning red (there's a lot of them). The regular tomatoes are getting bigger each day. This year, for the first time, I have peppers that are real size, not just miniatures. My carrots are already being harvested. They're a little small, but I couldn't wait.

I'd love to hear about what you're growing.

Thursday, June 26, 2014

Feeling Like a Kid Again

We didn't have the time to go camping this last weekend. Well, yes we did, but didn't get reservations in time. That's the problem with spontaneity. So, we camped out in the back yard. What fun it was. We put up the tent, pulled out the Colman Stove and once the camping started, we didn't go back into the house. Well, we used the fridge and bathrooms. We even had a fire in our fire pit. In the morning we woke up early to the "dawn chorus." Try it sometime, you'll feel like a kid again.


If you want to write a comment, click on the "no comments" link and the comments field will come up.

Monday, June 9, 2014

Southern England, Spring 2014

After leaving Poland, England was the next stop. I'm so fortunate to be able to travel there yearly.


In the little village of Sonning the pub was built hundreds of years ago. Here's the hallway leading up to our room. It's so charming.


 There are a lot of private people in Sonning - this sign was on an estate.


Though this photo isn't the best, you can see the quaint country lane.There are so many like this in south-west England. We could never have one-way lanes in Orange County. Everyone would be in a long line with two cars facing each other on the road - no one would get anywhere. 


Look at these street signs - they've been marking the way forever!


 Flowers even grow out of the walls.


After driving through the countryside, there are plenty of thatched pubs to stop and grab lunch.


We had lunch at the restaurant at the Shard in London. I love this old building and streetlight in front of the Shard - a ultra modern building.
 The views were amazing.


I guess that's enough travel log for now. I'll write again later.

Tuesday, June 3, 2014

Gdansk, Poland

I've just returned from a wonderful trip to Gdansk, Poland, followed by 10 days in the UK (I'll share my adventured in the UK at a later date). Gdansk is a beautiful city with a rich history. The people are friendly.


Notice all the windows, they seem to have been installed by the same company.


Even the gutters look charming.


Many of the roadways in town had these arches.

World War II is very much present in the various monuments around town. Gdansk was taken over by the Germans. Later they were bombed by the Americans and the English, leaving the city in rubble, but the people we happy to be free from the grip of the Germans. Much of the city had to be rebuilt using the bricks from the ruins. Unfortunately, they were then taken over by the Russians. It wasn't until 50 years later before they were once again free.

The monument below touched me the most. It show a photograph of Jewish men who were lined up against a wall and shot. This was before Hitler decided bullets were to expensive to do the job. The wall still has bullet holes in it and they've added metal fingerprints and chin prints in the exact spot where the men were. One can feel nothing but awe and respect in this place. The way it was done made the event absolutely real. It's difficult to describe the feelings from this place, knowing how many fell to the same fate.


On a lighter note, here I am for the very first time, standing on the shores of the Baltic Sea. The wind coming off the sea was very cold that day, but I never dreamed I would be in such a place. It was beautiful.


I'm waving bye for now, but will write again in the few days with some pictures of England, a place I go every year or so.